


Did you hear about the contractor who put up sheet-rock before the wiring was in the wall? No? Well, neither have we. A kitchen remodel is a complex process, thus, everything has to happen in sequence. A step-by-step checklist, whether you use the one below or develop your own, will help you stay on track and moving forward.
Phase 1: Assess Your Goals
Carefully analyze exactly what you hope to achieve with your kitchen remodel. Consider the following:
- Do you have enough floor space?
- Are there any traffic bottlenecks?
- Do you have any special storage needs?
- Is your cooking style occasional, casual or professional?
- Does anyone in the home have difficulty bending or reaching?
- Will average-height counters work for everyone in the family?
- What other activities besides cooking happen in your kitchen?
- What features are you looking for in cabinets, flooring, sink, lighting, countertops and backsplash?
- Do you have some high-priority wants, such as a pro range or granite countertops?
- What look do you hope to achieve?
- When do you want the project to be completed?
Phase 2: Assess Your Resources
- Take pictures – you, your designer and your contractor will refer to them during planning.
- Measure your space Create a floor plan of your current space. Including windows, doors, electrical outlets and switches, vents, plumbing and any other significant features.
- Do you plan on doing any work yourself? Break the project down into tear-out, rough construction, installation of each product, and finish carpentry. Make a list of tools and project time for each part of the project. Now determine what you will do yourself and where it makes sense to hire a professional.
- Will you be using existing appliances or refacing cabinets?
- What is your budget? (This should be less than 20% of the value of your home and include a 20% buffer for unexpected expenses.)
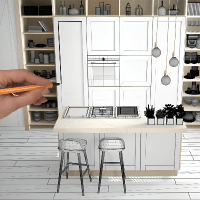
Phase 3: Create a Kitchen Design & Shop for Materials
- Select appliances and cabinets (your designer will need this information).
- Decide what type of material you want for flooring, countertops and backsplash, and what type of lighting you want.
- Work with a professional to develop a detailed layout as well as installation notes for your contractor. Use a free kitchen design service or allocate 4-15% of your budget for a local interior design studio.
Phase 4: Hire a Contractor
- Use personal recommendations and online directories like Angie’s List to develop a list of contractors.
- Cross off any without license, bonding or insurance.
- Cross off any who are not free to complete the project on your schedule.
- Eliminate any who have not recently completed similar projects.
- Assemble a packet with your detailed design and a list of materials. Additionally, provide exactly the same specs to each contractor.
- Interview contractors (see Interviewing Contractors and Evaluating Bids)
- Call references.
- Sign a contract.
Phase 5: Construction
- Take progress photos.
- Set up housekeeping in your temporary kitchen.
- Provide coffee, water and sodas for work crews.
- Be available to answer questions.
- Check off items in the contract as they are completed.
- Do not tie the contractor or workers up in long conversations.
- Collaborate with the contractor to work out unexpected issues.
Phase 6: Decorate & Enjoy
- When the construction debris is cleared away, display a few carefully chosen items in glass-door cabinets and open shelves. Finally, take pictures of your new kitchen space and prepare to enjoy.
Additional Resources
Did we miss anything on our remodel checklist? Share your thoughts and experience with our readers by posting a comment below.
